Slippers are a thoughtful and welcome gift, hugging the feet of your loved ones and keeping them cosy and warm.
 Pin
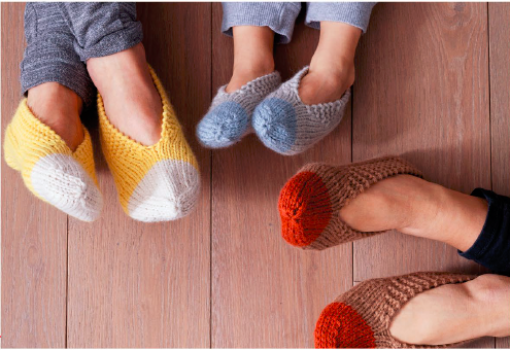
Pin Our knitted slippers are comfortable to wear, and also look great. For small and large feet, to give away, or keep for yourself! You will find tips and tricks on knitting from here.
 Pin
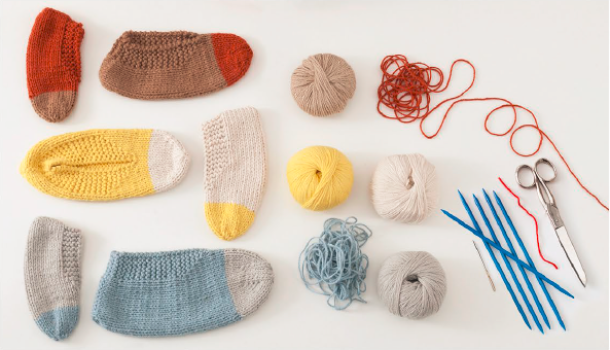
Pin You will need:
- Set of 20cm (8in) long 5mm (UK 6: US 8) double-pointed needles
- Wool in 2 colours, here: Lamana Cusco (100% alpaca), quantity according to size: Size 1 (27–29, 4–6 years, foot length about 17.5cm / 7in): about 50g (1¾oz) colour A, about 15g (½oz) colour B Size 2 (30–32, 7–9 years, foot length about 19.5cm / 7¾in): about 100g (3½oz) colour A, about 30g (1oz) colour B Size 3 (35–36, foot length about 22cm / 8¾in): about 100g (3½oz) colour A, about 30g (1oz) colour B Size 4 (38–39, foot length about 24cm / 9½in): about 100g (3½oz) colour A, about 30g (1oz) colour B Size 5 (40–41, foot length about 26cm / 10½in): about 130g (4¾oz) colour A, about 45g (1½oz) colour B
- Stitch marker
- Scissors
- Yarn needle
How to make Hand Knitted slippers?
Tension sample: 17 stitches and 22 rows stocking stitch, with the yarn knitted double, using 5mm (UK size 6) needles = 10 × 10cm (4 × 4in).
The slippers are knitted with the yarn held double. If you have 2 balls of wool, knit with a strand from each ball. If you only have 1 ball, find the end of the yarn in the centre of the ball and knit this together with the thread coming from the outside.
Both slippers are knitted identically, partly in stocking stitch, partly in garter stitch. Initially they are knitted back and forth, then in rounds on the double-pointed needles. For the garter stitch selvedge, the edge stitches are worked by slipping the first stitch knit-wise at the start of each row; the final stitch in each row is simply knitted. The details for the different sizes are given in brackets: size 1 (size 2: size 3: size 4: size 5).
Step 1: Cast on 26 (30:30:34:38) stitches loosely in colour A with the yarn held double. The trailing yarn end should be about 25cm (10in) long, to allow you to use this to sew up the heel seam later.
Step 2: 1st row (wrong side): edge stitch, knit 4 (5:5:6:6), purl 16 (18:18:20:24), knit 4 (5:5:6:6), edge stitch.
Step 3: 2nd row (right side): edge stitch, knit to end, edge stitch.
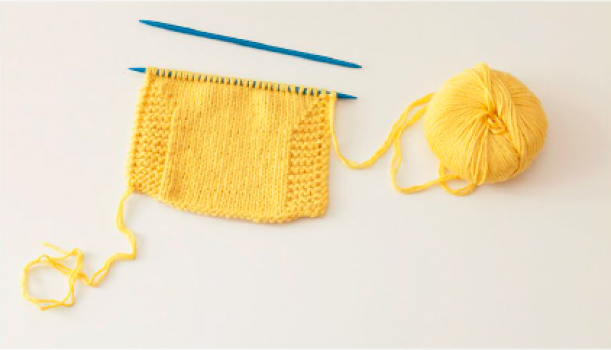
Step 4: Repeat the 1st and 2nd rows until, after about 20 (22:26:28:30) rows, the piece measures 8 (9:11.5:12.5:13.5) cm (3 [3½:4½:5:5¼] in).
 Pin
Pin Step 5: From the next wrong side row, reduce the lateral garter stitch sections on every wrong side row as follows: edge stitch, knit 3 (4:4:5:5), purl 18 (20:20:22:26), knit 3 (4:4:5:5), edge stitch.
Step 6: Next right side row: edge stitch, knit to end, edge stitch.
Step 7: Next wrong side row: edge stitch, knit 2 (3:3:4:4), purl 20 (22:22:24:28), knit 2 (3:3:4:4), edge stitch.
Step 8: Next right side row: edge stitch, knit to end, edge stitch.
Step 9: Reduce the garter stitch section in this manner until on a wrong side row there is just 1 stitch knitted between the edge stitches at the start and end of the row, and the stitches in between are all purl stitches. The piece should measure 11 (12.5:14:16:17.5) cm
(4¼ [5:5½:6¼:7] in) and have 25 (29:33:37:39) rows.
Step 10: On the next right side row, the stitches are distributed between 4 double-pointed needles. The 1st needle is always the beginning of a round. To help you count the rounds, place a stitch marker on needle 1. On needle 1, work the 1st decrease: knit 1, SKP (slip one (knitwise), knit 1, pass slipped stitch over). On needle 4, work the 2nd decrease: knit the second- and third-last stitches on the needle together. There should now be 6 (7:7:8:9) stitches on each needle.
Step 11: On the 4th round (counting from the stitch marker on needle 1), switch to colour B at the start of the 3rd needle. Cut the double strands of colour A and continue to knit in rounds.
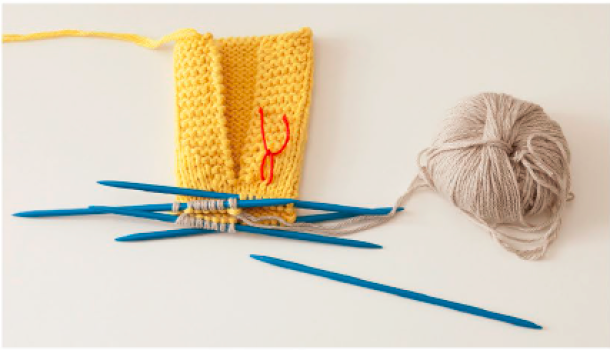 Pin
Pin Step 12: At the start of round 5 (5:5:6:6) in colour B, begin decreasing for the tip (start on needle 1). To do this, work the 1st decrease on needles 1 and 3 and the 2nd decrease on needles 2 and 4. Work the decreases on every other round until there are 5 (4:4:5:5) stitches on every needle.
Step 13: Now work the decreases on every round until there are 2 stitches on each needle for any size of slipper. Cut the double strands and use a yarn needle to pull these through the remaining stitches.
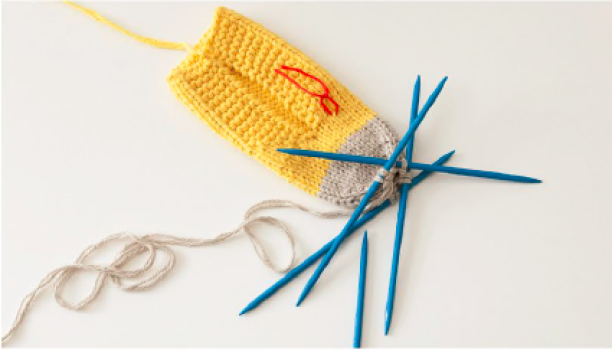 Pin
Pin Step 14: Turn the slipper wrong side out and sew in the threads carefully on the inside at the tip and at the colour change.
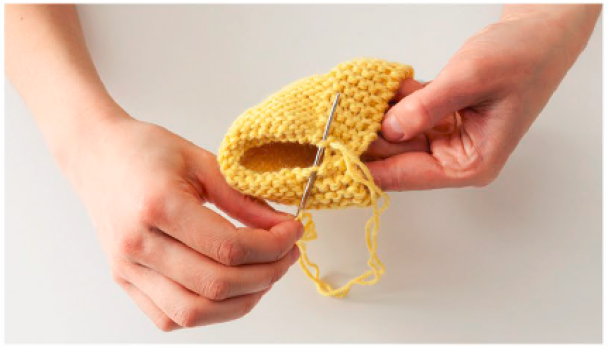 Pin
Pin Step 15: Fold over the cast on edge (at the rear centre) and close the heel seam neatly, using the wool you left hanging from when you cast on. Work the second slipper in exactly the same way.
“That which issues from the heart alone, will bend the hearts of others to your own”
– Johann Wolfgang von Goethe
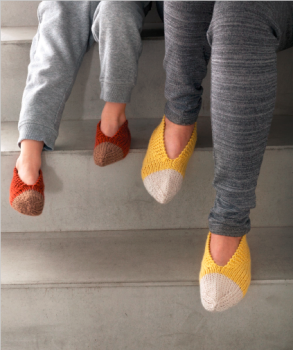 Pin
Pin As a beginner, it's important to choose a simple pattern and take your time to follow the instructions carefully. With practice, you will improve your knitting skills and be able to tackle more complex projects:
- 1. Gather the materials: To make hand-knitted slippers, you will need yarn in your preferred color, knitting needles (size 8 or 9 works well for most people), a tapestry needle, and a pair of scissors.
- 2. Choose a pattern: There are many easy knitted slipper patterns available for beginners online. Look for one that is clearly written and includes step-by-step instructions and photos or illustrations.
- 3. Cast on: Start by casting on the required number of stitches for your slipper size. This will form the base of your slipper.
- 4. Knit the sole: Once you have cast on, knit the sole of the slipper by following the pattern instructions. This may involve knitting in garter stitch or in stockinette stitch, depending on the pattern.
- 5. Knit the body: After you have completed the sole, continue knitting to create the body of the slipper. This may involve adding stitches, shaping the toe, or creating a ribbed cuff, depending on the pattern.
- 6. Finish the slipper: Once you have completed the body of the slipper, finish off according to the pattern instructions. This may involve binding off stitches, sewing seams, or adding a decorative edging.
- 7. Repeat: Once you have finished one slipper, repeat the process to create the second slipper.
- 8. Customize: Feel free to customize your slippers by adding embellishments such as pom-poms, buttons, or embroidery.
- 9. Wear and enjoy: Once both slippers are completed, try them on and enjoy the warmth and comfort of your hand-knitted creation.
For beginners making hand-knitted slippers, it is recommended to use a medium weight yarn, such as a worsted weight yarn, as it is easier to work with than finer or bulkier yarns. As for knitting needles, a pair of size 8 (5 mm) straight or circular knitting needles is a good choice for beginners as they are versatile and commonly used for many knitting projects. Additionally, 16-inch circular needles may be helpful for knitting the circular shape of the slippers. Overall, it is best for beginners to choose materials that are easy to work with and not too challenging to handle.
The basic knitting techniques and stitches required to make hand knitted slippers for beginners include:
- Casting on: This is the first step in starting a new knitting project. There are various methods for casting on, but for beginners, the knitted cast-on method is usually the easiest to start with.
- Knit stitch: The knit stitch is the most basic and commonly used stitch in knitting. It creates a smooth, flat fabric and is often used to create the main body of the slipper.
- Purl stitch: The purl stitch is the second most basic stitch in knitting. It creates a bumpy, textured fabric and is often used for ribbing, which is often seen on the cuff of slippers.
- Stockinette stitch: This stitch is created by knitting one row and purling the next, creating a smooth side (the right side) and a bumpy side (the wrong side) of the fabric.
- Garter stitch: This stitch is created by knitting every row, resulting in a fabric with ridges. It is often used for the sole of the slipper to provide extra cushioning.
- Decreases: Decreases are used to shape the fabric in knitting. The most basic decrease is the knit two together (K2tog) and the purl two together (P2tog) decreases.
By mastering these basic techniques and stitches, beginners can create a simple and cozy pair of hand-knitted slippers.
FAQs on Hand Knitted Slippers:
Caramel hearts are delicious, heart-shaped treats made from a combination of caramel and chocolate. They are a popular choice for Valentine’s Day, but can be enjoyed any time of year.
You can use any type of yarn for your slippers, but keep in mind that thicker yarn will produce bulkier slippers, while thinner yarn will produce more delicate slippers. Choose a yarn that is comfortable to wear and suitable for the intended use of the slippers.
The size of the needles will depend on the thickness of the yarn and the size of slipper you want to make. Check the yarn label for the recommended needle size, and adjust as needed to achieve the desired gauge for your project.
Yes, there are many different patterns for knitting slippers, ranging from simple garter stitch patterns to more complex cable or lace patterns. For beginners, it’s best to start with a straightforward pattern to get the hang of making slippers.
Some slipper patterns are knitted in the round, while others are knitted flat and seamed at the end. If you’re new to knitting, you may want to start with a pattern that is knitted flat and seamed, as it can be easier to manage than working in the round.
The time it takes to knit a pair of slippers will depend on the complexity of the pattern, your knitting speed, and the size of the slippers. A simple pair of slippers can be completed in a few evenings of knitting, while more complex patterns may take longer.
Hand knitted slippers can be hand washed with mild detergent and laid flat to dry. Be sure to reshape the slippers while they are damp to ensure they retain their shape. Avoid washing knitted slippers in the washing machine, as this can cause them to stretch and lose their shape.

