There’s no need to wear a necklace if your clothing is gently sparkling with translucent pearly beads.
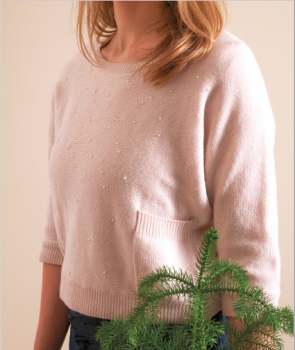
With just a few stitches you can jazz up a simple jumper in festive fashion. Simply stitch on a few pretty beads and your Christmas top is ready: a really special present.
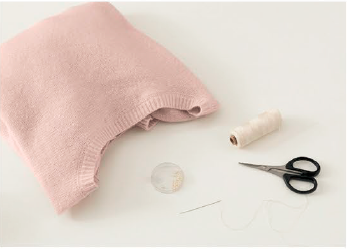
You will need:
- Beading needle
- Thread in a suitable colour
- Glass wax beads, 4mm (¼in) diameter
- Woollen jumper
- Scissors
How to make Beaded jumper?
Step 1: Using a beading needle and thread, sew pearly beads on to the jumper. Take care to sew in the loose thread ends. If the beads are spaced no further than 3–4cm (1¼–1½in) apart, you can run the thread between them on the inside of the garment.
Step 2: You can arrange the beads spaced out exactly as you please. We began at the top with lots of beads, then gradually spaced them out more widely further down. We left the sleeves completely plain, but of course the beads look absolutely lovely there, too, if you prefer.
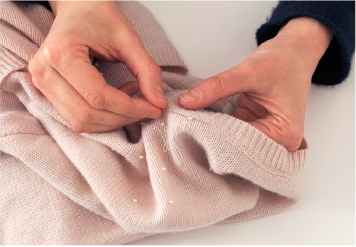
To make a beaded jumper sparkling with translucent pearly beads, you will need:
– A plain jumper in a color of your choice
– Translucent pearly beads
– Needle and thread
– Fabric glue
– Beading needle
– Scissors
Here’s how to make the beaded jumper:
- 1. Lay out your jumper on a flat surface and decide on the design you want to create with the beads. It could be a simple pattern, a scattering of beads, or a specific shape.
- 2. Thread the beading needle with a length of thread, knotting the end securely. This will make it easier to sew on the beads.
- 3. Start sewing the beads onto the jumper according to your chosen design. Make sure to secure each bead with a few stitches to ensure it stays in place.
- 4. If you prefer not to hand-sew the beads, you can also use fabric glue to attach them to the jumper. Simply apply a small amount of glue to the back of each bead and press it onto the fabric. Allow the glue to dry completely before wearing the jumper.
- 5. Continue adding beads until you are satisfied with the overall look of the jumper. You can create a subtle scattering of beads or cover the entire jumper for a more dramatic effect.
- 6. Once all the beads are in place, allow the jumper to dry completely if you used fabric glue.
- 7. Once the jumper is completely dry, it’s ready to wear and show off its sparkling, beaded design. Enjoy your custom-made, pearly beaded jumper!
Some beading techniques that are best suited for creating a sparkling effect with translucent pearly beads on a jumper include:
- 1. Embroidery stitch: The embroidery stitch can be used to create intricate patterns with pearly beads, resulting in a shimmering and sparkling effect.
- 2. French beading: This technique involves using wire to create beaded flowers and other designs, which can add a three-dimensional sparkling effect to the jumper.
- 3. Crystal netting: Crystal netting involves weaving beads together to create a net-like pattern, which can give a subtle yet sparkling effect to the jumper.
- 4. Bead weaving: This technique allows for the creation of elaborate designs using pearly beads, resulting in a mesmerizing and sparkling effect on the jumper.
- 5. Bead embroidery: By strategically placing pearly beads on the jumper using bead embroidery techniques, a sparkling effect can be achieved.
The key is to use techniques that allow for a high concentration of translucent pearly beads and their placement in a way that catches the light and creates a sparkling effect.
Some tips for securing and attaching beads to fabric:
- 1. Use a strong and durable thread or beading wire to sew the beads onto the fabric. This will help ensure that the beads stay in place and maintain their sparkle over time.
- 2. When sewing beads onto fabric, make sure to knot the thread securely after each bead to prevent them from coming loose.
- 3. Consider using a beading needle, which is specifically designed for sewing beads onto fabric and has a smaller, more flexible eye that makes it easier to pass through the beads.
- 4. Use a bead backing or interfacing to provide extra support for the beads and prevent them from pulling or stretching the fabric.
- 5. If you’re attaching larger or heavier beads, consider using a small amount of fabric glue to secure them in place before sewing them onto the fabric.
- 6. For extra security, you can add a few stitches around the beads in a cross pattern to ensure they stay in place.
By following these tips and tricks, you can ensure that the beads stay in place and maintain their sparkle on the fabric.
FAQs for Beaded jumper
To make a beaded jumper sparkling with translucent pearly beads, you will need a plain jumper in a color of your choice, translucent pearly beads, beading thread, beading needles, scissors, and a beading mat.
You can use any plain, solid-colored jumper for this project. Choose a jumper that fits well and has a smooth surface for easy beading.
Begin by laying out your jumper on a beading mat or a clean, flat surface. Thread a beading needle with the beading thread and tie a knot at the end. This will prevent the thread from slipping through the fabric as you bead.
Start by stitching the beading thread through the fabric of the jumper from the inside, bringing the needle up through the surface. Then, string a few translucent pearly beads onto the needle and thread and stitch them back down into the fabric. Continue this process to create a pattern or design with the beads.
Yes, you can create any pattern or design you like with the translucent pearly beads. You can make simple straight lines, geometric shapes, or even intricate floral or abstract designs.
After you have stitched the beads onto the jumper, make sure to secure them in place by stitching through the beads a few times to ensure they are firmly attached to the fabric.
To ensure the beads are evenly spaced and aligned, you can use a ruler or marking pencil to lightly sketch the design onto the jumper before you begin beading. This will help you keep the beads in the desired pattern and prevent them from becoming uneven.
When caring for your beaded jumper, it’s best to hand wash it in cold water and lay it flat to dry to prevent the beads from getting damaged in the washing machine or dryer.
Absolutely! You can customize your beaded jumper with any colors or types of beads you like. You can choose different shapes, sizes, and colors of beads to create a unique and personalized design.
Yes, this project is suitable for beginners who have some basic sewing and beading skills. It may take some patience and practice, but with the right materials and guidance, you can create a beautiful beaded jumper sparkling with translucent pearly beads.


