

























 Pin
Photo Courtesy of Pexels
Synopsis: One litre of milk can turn into soft paneer, white butter and golden ghee without a dairy plant or a costly machine. A heavy pot, a thermometer, a clean cloth and some patience are enough to begin. This guide covers the right milk, the equipment worth owning, step-by-step methods for each product, honest yield figures, storage rules and the common mistakes that spoil a batch. Read it once, and the shop’s tub of butter may start to look a little smug.
Milk has always had ambitions. Left alone on a warm afternoon, it sours, sets and separates, and in doing so it teaches the whole of dairy farming. Cheese, curd, butter and ghee are simply milk getting on with its life while somebody pays attention.
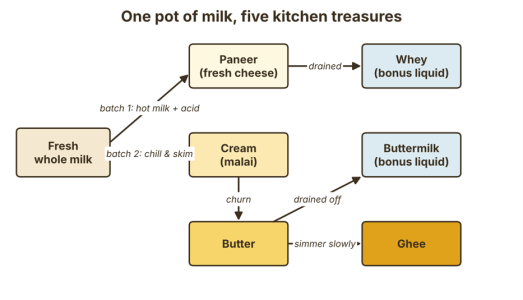
This guide shows how to make cheese, butter and ghee at home from milk, using nothing grander than a pot, a cloth and a thermometer. Milk curdles into paneer, the fresh cheese of this guide. Its cream churns into butter. The butter, simmered slowly, becomes ghee, and the liquids left behind find work in dough, dal and the garden.
Homemade also means honest. There are no preservatives, no mystery colours and no label written by a committee, only milk, patience and a kitchen that smells, for an hour or so, as if a grandmother has dropped in. Nothing here asks for a farm, a cow or a cellar.
- Paneer: fresh, soft and ready in under an hour
- White butter: made from cream, with buttermilk as a free extra
- Ghee: golden, nutty and shelf-friendly
- Kit list, yields, storage rules and mistakes to dodge
 Pin
Paneer and cream come from separate batches of milk. Whey and buttermilk are the useful by-products.
Table of Contents
Best Milk for Homemade Paneer, Butter and Ghee: Whole, Raw or Packet?
The cook’s first big decision is made at the shop. Full-fat milk is a good starting point, and the reason is worth knowing. Paneer forms when heat and acid make the milk proteins, mainly casein, clump together, and the fat gets caught in the curd, adding richness and weight. Butter and ghee, on the other hand, are made almost entirely of milk fat.
Fresh cow and buffalo milk both work. Buffalo milk usually gives firmer paneer and a bigger block, while cow milk paneer comes out softer. UHT and lower-fat milk are not forbidden, but results vary, and several recipe sources report smaller or crumblier blocks. Raw milk should be pasteurised first: 63°C for 30 minutes, or 72°C for 15 seconds, then cooled quickly to 4°C or below.
Fat also decides the ghee harvest. Cow milk at 3.5 to 4 percent fat gives roughly 31 to 38 grams per litre, while full-cream packet milk, usually around 6 percent fat (check the carton), gives about 50 to 60 grams. Toned milk manages only 20 to 30. These are estimates, not promises.
- Good starting point: fresh full-fat milk, and plain cream with no thickeners or gums for butter
- Use with care: UHT or low-fat milk (results vary), cooking cream (too little fat to churn well) and ultra-pasteurised cream
Equipment for Home Cheese, Butter and Ghee Making: The Short, Honest List
 Pin
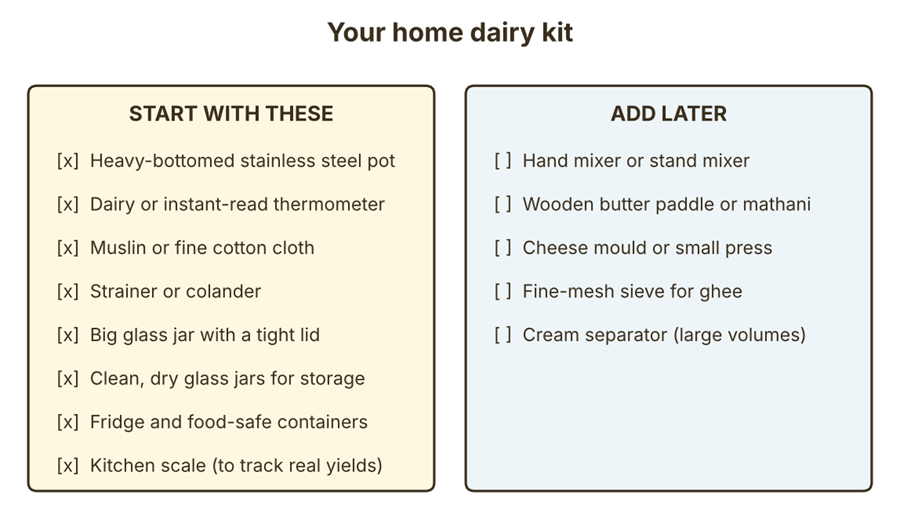
Start with the left column; add the right column once the habit sticks.
The equipment list is short, and most of it is already in the kitchen, quietly waiting to be useful. A heavy-bottomed stainless steel pot comes first. Milk scorches the way gossip spreads, and a thin pot makes both worse. A heavy base spreads the heat evenly and keeps hot spots from burning the bottom layer.
Next come a thermometer, digital or dairy type, and muslin or any clean, fine cotton cloth. A new thin tea towel will do in an emergency. Aluminium and cast iron pots react with acid and are best avoided. Most home cheese failures trace back to tools that were not properly cleaned, so cleaning and sanitising everything before and after each batch pays off.
Butter needs a big glass jar with a tight lid, or a hand mixer for the lazy-armed. Ghee needs a dry strainer and dry glass jars, because water is ghee’s oldest enemy. A fridge, food-safe containers and a kitchen scale matter as much as the pot, since fresh dairy spoils quickly and the scale shows the true yield. A cheese press and fancy moulds can wait until the hobby turns into a habit.
- Cream separation: skimming malai by hand costs nothing and suits small batches. A manual or electric cream separator saves time only when the milk volume is large.
- Churning: a jar or whisk is fine for small batches, a hand mixer is faster, and a stand mixer or electric churn suits regular, bigger batches.
How to Make Paneer at Home From Milk: A Simple Fresh Cheese Recipe
Of all the cheeses in the world, paneer is the one that suits a home kitchen best, and it is the only cheese made in this guide. It needs no culture, no rennet and no ageing cave, only hot milk and a little acid. Heat and acid make the milk proteins gather into pale curds, leaving a thin greenish whey.
Heat one litre of full-fat milk to about 80 to 90°C, when it steams and tiny bubbles line the pot, or until it just reaches a boil. Switch off the flame and add the acid a little at a time, stirring gently. Curds gather within a minute or so and the whey turns clear. Avoid boiling on after the curds form, which makes the cheese hard and crumbly.
Pour everything through a cloth-lined strainer, gather the corners and press the bundle under a weight: about 15 minutes for soft paneer, 30 for firm. Dairy references put yield at roughly 17 to 18 percent of the milk’s weight for cow milk and 21 to 23 percent for buffalo milk, or about 170 to 230 grams a litre. One home recipe gave around 340 grams from 1.9 litres.
- 1 litre full-fat milk
- 2 to 3 tablespoons lemon juice or vinegar
- A pinch of salt, if liked
- Yield: indicative only, since milk, heating, acid and pressing all change it
- Storage: refrigerate promptly in a clean, airtight container and use within a few days
Lemon Juice, Vinegar or Curd? Choosing the Right Acid for Softer Paneer
Any food acid will curdle hot milk, but each leaves its own fingerprint. Lemon juice is a favourite for its mild flavour and fresh-tasting cheese. White vinegar is sharper and more brisk. Yogurt, buttermilk and citric acid also work, and when the milk has been properly boiled the yield stays much the same.
Restraint matters. Too much acid makes tough paneer, and the right amount is judged by eye: add a little, stir, wait for the whey to clear, and add more only if the milk still looks undecided. Sweet-makers chasing the softest curd for desserts like rasmalai often reach for lemon juice or yogurt.
The whey is not rubbish. It is a protein-rich liquid that keeps three to five days in a sealed jar in the fridge, and it has plenty of second careers. A cook who saves it finds that nothing in the pot is wasted.
- Knead it into roti or bread dough
- Stir it into soups and dal
- Water the garden with it as a gentle plant feed
How to Collect Malai (Milk Cream) for Butter Without a Cream Separator
Butter cannot be made from milk. It must be cream, a fact that has disappointed many a cook who shook a jar of milk for an hour and received only tired arms.
The old kitchen solution is malai. Boil the milk, cool it promptly and keep it in the fridge in a clean, covered container. Once it is chilled, lift the cream layer off with a clean spoon into a clean, airtight container and return it to the fridge at once. To collect over several days, freeze the cream in small portions straight away, never leaving it out at room temperature. Thaw a portion in the fridge before churning, and do not thaw and refreeze.
The shortcut is a carton of heavy cream with no thickeners or stabilisers. Cooking cream has too little fat to churn well, and ultra-pasteurised cream is best avoided, since it tends to refuse the whole idea.
- Higher-fat cream gives more butter
- Keep cream cold at every step, and use clean, sanitised tools
How to Churn Butter at Home: Jar, Hand Mixer or Traditional Mathani
Butter-making is one of the few kitchen processes that starts with a single ingredient and finishes with two: butter and buttermilk. The cream passes through stages, first liquid, then whipped, then a sudden collapse into yellow clumps floating in thin liquid. That last stage is the signal to stop.
Cream churns best when it is cool but not cold, often around 16 to 18°C (60 to 65°F), though the ideal shifts with the cream’s fat level and the weather. Too cold and it churns forever. Too warm and the butter turns soft and gloopy. In a jar, fill it halfway and shake for 10 to 20 minutes. A hand or stand mixer needs only a few minutes. Strain the buttermilk off and keep it for pancakes.
Rinse the butter in ice-cold water, pressing it and changing the water three or four times until it runs clear. A pinch of salt, about 1/8 to 1/4 teaspoon per cup of cream, is optional. In one tested recipe, 600 ml of cream at 35 to 38 percent fat gave 180 to 200 grams of butter, which is an example, not a promise.
- Jar method: shake, strain, rinse, press
- Mixer method: whip, wait for the split, drain, rinse
- Keep fresh butter covered in the fridge. To freeze it, use airtight, freezer-safe wrapping, use it within roughly 3 to 6 months for best flavour, and thaw it in the fridge
How to Make Ghee From Butter at Home: Easy Steps and Signs It Is Done
Ghee is butter that has been taken seriously. Slow heat boils off the water and lets the milk solids settle and brown, leaving a clear golden fat with a nutty aroma. It splatters less than butter and keeps far longer, because almost all the water has been cooked out.
Cut unsalted butter into cubes and melt it in a heavy pot over low heat. It foams, spits and gradually calms down. When the foam thins, the solids sink and brown, and the nutty smell wanders through the house, the ghee is nearly done. Simmer a couple of minutes after the solids settle, and stay close, because burnt ghee is bitter.
Let it cool, then strain through muslin or a fine sieve into a clean, dry glass jar, and seal it only once it is cold. One kilogram of butter gives roughly 780 to 820 grams of ghee, give or take. Cooking time depends on the amount of butter, its water content, the pan and the heat, so judge by the signs below, not the clock.
- Foam turns thin and the bubbling quietens
- The liquid turns clear and golden
- Brown solids rest at the bottom
- The aroma is warm and nutty, never sharp or burnt
Bilona Ghee vs Cream Method: How Much Milk Does 1 kg of Ghee Take?
 Pin
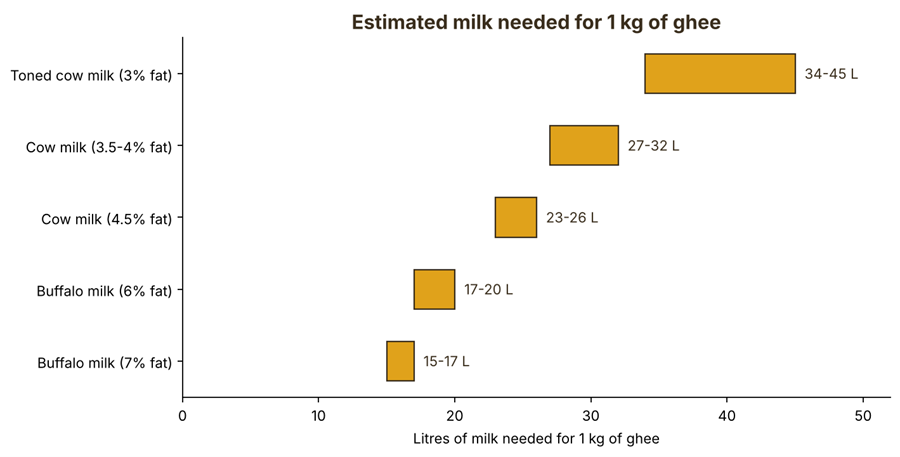
Estimated litres of milk for 1 kg of ghee, by milk fat. Real yields vary with fat recovery and losses.
Two schools of ghee exist, and both have loyal followers. The traditional bilona method boils the milk, sets it into curd with a spoonful of starter, churns the curd with a wooden churner in both directions, and then heats the butter into ghee.
The cream method skips the curd stage and works with cream and butter directly. Traditional accounts quote 25 to 30 litres of milk for one litre of hand-churned ghee, but the true figure depends on the milk’s fat, how much fat the cream separation recovers and the losses along the way.
Fat decides the harvest. Milk at 3.5 to 4 percent fat gives about 31 to 38 grams of ghee a litre, and milk at 6 percent gives around 53 to 57 grams, the same range quoted earlier for full-cream packet milk. The chart is an estimate based on fat percentage. Real batches lose a little fat in buttermilk, skimmed milk and strained solids, so expect slightly less.
Homemade Dairy Cost, Time and Yield: What One Litre of Milk Really Gives
 Pin
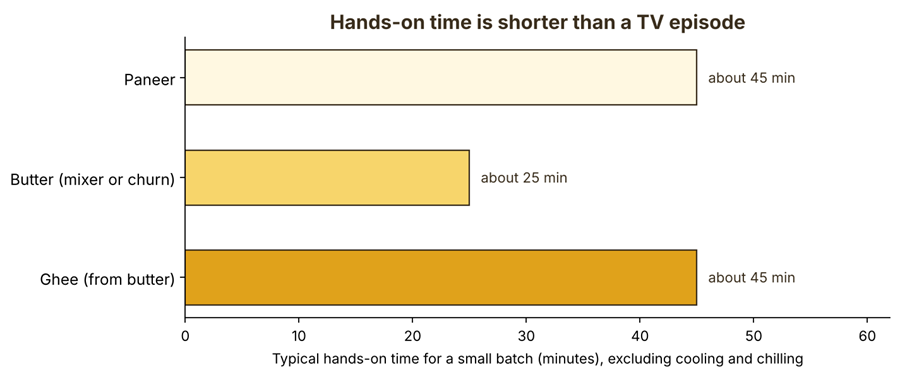
Typical hands-on time for a small batch, excluding cooling and chilling.
Honest arithmetic belongs on every kitchen wall. One litre of milk never becomes one litre of anything fancy. As a rule, it gives about 30 to 65 grams of ghee, or, if the cook prefers cheese, roughly 170 to 230 grams of paneer, depending on the milk, its fat and how long the cloth sits under the weight.
Time is kinder than the figures. The chart shows hands-on time only: paneer about 45 minutes, butter around 25 with a mixer or churn, and ghee 30 to 45 minutes of low simmering. Cooling, setting, chilling and days of collecting malai come on top.
For the savings test, multiply the litres by the local milk price. Say milk costs 60 rupees a litre (an example only): 30 litres for a kilogram of ghee is 1,800 rupees before fuel and effort. Compare that with the shelf price, then add the extras: buttermilk, whey and the skimmed milk left after the cream is taken.
How to Store Paneer, Butter and Ghee, and the Mistakes That Spoil a Batch
Storage stops all that careful work being wasted. Homemade paneer has no commercial preservation, so it belongs in a clean, airtight container in the fridge at 4°C or below, in small batches that are eaten within a few days. Anything that smells odd, feels slimy or shows mould goes in the bin. Fresh homemade butter also lives in a covered container in the fridge, or in the freezer for longer.
Ghee wants a clean, dry, airtight glass jar, a spot away from sunlight, heat and moisture, and a dry spoon, since one wet spoon can undo a whole batch. Its shelf life depends on how thoroughly the water was removed, how clean the tools were and how it is stored, so no fixed number suits every homemade batch.
Most failures repeat the same few mistakes, all listed below, and fixing them lets the pot forgive nearly everything else. Anyone planning to sell homemade dairy should also check local food-safety rules, such as FSSAI registration in India, before the first sale.
- Low-fat or UHT milk: softer or crumbly paneer in many recipes
- Boiling on after the curds form: tough cheese
- Too much acid: hard paneer
- Cream too warm: soft, gloopy butter
- Warm jar sealed or water in the jar: spoiled ghee
- Unclean tools or aluminium pots: off flavours and failed batches
FAQs
No. Butter needs cream. Collect malai from boiled, chilled milk, or buy additive-free heavy cream, then churn it while cool, around 16 to 18°C, until it splits into butter and buttermilk.
Common causes are low-fat milk, too much acid, and boiling the curds after they form. Use fresh full-fat milk, add acid slowly and switch off the heat once the whey clears.
Roughly 780 to 820 grams, though the exact figure varies. The rest is water and milk solids that cook away or settle at the bottom of the pot and get strained out.
It depends on moisture removal, clean tools and storage. Use a clean, dry, airtight jar away from heat, light and moisture, and a dry spoon. Discard it if it smells sour or bitter.
Pasteurise it first: 63°C for 30 minutes, or 72°C for 15 seconds, then cool quickly to 4°C or below. Clean and sanitise all tools before and after each batch.
References and sources
• Paneer production: A review (Journal of Food Science and Technology, PMC)
• Paneer, an Indian soft cheese variant: A review (PMC)
• NIFTEM paneer processing notes (yield and heat treatment)
• Recent innovations in functionality and shelf life enhancement of ghee (PubMed)
• FSSAI milk standards (pasteurisation conditions)
• UC Cooperative Extension, Master Food Preservers (equipment, cleaning and raw milk safety)
• Pantry Mama (homemade butter yields); Milkio (butter-to-ghee ratio); Asianet Newsable (ghee yield per litre); Food Network (paneer recipe)
Yields, temperatures and timings are indicative and vary with milk, fat content, equipment and technique.









 Login with Google