


This DIY project isn’t just for Christmas: if you make enough, it should provide a wonderfully fragrant reminder of your gift all year round.
 Pin
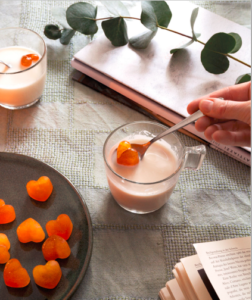
Pin These little crystal-shaped soaps are quick to make and can be enriched with various scents, or combined with herb leaves and flower petals.
 Pin
Pin You will need:
- Large saucepan
- Small saucepan, or heatproof bowl
- Raw soap, transparent and white
- Diamond-shaped silicone mould
How to make Soap Diamonds?
Step 1: Heat some water in a large saucepan. Then suspend a smaller saucepan, or heatproof bowl, over the larger one, add the raw soap and melt it in this bain-marie.
Step 2: When the raw soap has completely melted, pour it into a silicone mould and put it in a cool place. After about 1 hour the soap will have solidified and you can release the individual pieces from the mould.
“A true gift is something you offer to someone else that you would rather have kept for yourself”
– Selma Lagerlöf
You can add fragrance to the soap by using an essential oil of your choice. Just add a couple of drops of oil to the liquid soap before you pour it into the mould.
Soap diamonds are a fun and creative Christmas craft that can be enjoyed by both kids and adults. Making your own soap diamonds allows you to personalize your gifts, decorations, or even add a touch of luxury to your bathroom.
To start, gather all the necessary materials. You will need clear glycerin soap base, diamond-shaped soap molds, soap coloring or mica powder, fragrance oils, a microwave-safe bowl, a microwave or a double boiler, a spoon or spatula, and optional additions like dried flowers, gold flakes, or glitter.
First, cut the clear glycerin soap base into small cubes. The amount you need will depend on the number of soap diamonds you want to make. A general rule is to use about one ounce of soap base per diamond mold.
Next, melt the soap base in a microwave-safe bowl. If you don’t have a microwave, you can use a double boiler on the stove. Heat the soap base in short bursts, stirring after each interval, until it melts completely. Be careful not to overheat the soap as it may become too hot or create air bubbles.
Once the soap base is fully melted, add your desired soap coloring or mica powder to achieve the desired shade. You can create different colors or opt for a transparent diamond. Stir the coloring in gently until it is well incorporated into the melted soap.
Now is the time to add fragrance oils if you want scented soap diamonds. Choose a Christmas-inspired scent like cinnamon, peppermint, or vanilla. Be cautious not to add too much fragrance oil as it may cause the soap to become softer.
If you wish to include any optional additions like dried flowers or glitter, sprinkle a small amount into each diamond mold before pouring in the soap. This will give your soap diamonds an extra decorative touch.
Carefully pour the melted soap mixture into the diamond-shaped soap molds. Fill each mold to the top, ensuring the soap reaches all corners and edges. If any bubbles form on the surface, spray them with rubbing alcohol to help eliminate them.
Allow the soap diamonds to sit and cool for at least 30 minutes. Once completely cooled and hardened, gently pop the soap diamonds out of the molds. If you have trouble removing them, you can use a toothpick or small skewer to help loosen the edges.
Finally, gather your beautifully crafted soap diamonds and admire your Christmas-themed creations. They can be used as decorative pieces around the house, given as gifts to friends and family, or used in your own daily skincare routine.
Remember to store the soap diamonds in a cool, dry place to extend their shelf life. Now you can enjoy the festive feeling of Christmas with your homemade soap diamonds!
Another step-by-step process for making soap diamonds, including shaping and decorating them:
- Materials needed:
1. Clear glycerin soap base
2. Diamond-shaped soap mold
3. Soap colorant or mica powder (optional)
4. Essential oils or fragrance oils (optional)
5. Soap-safe glitter or mica powder (optional)
6. Rubbing alcohol in a spray bottle
7. Soap thermometer
8. Knife or soap cutter
9. Heat-resistant measuring cup or microwave-safe bowl
10. Stirring utensil (preferably silicone)
11. Decorative elements like dried flowers, crystal gems, or soap embeds (optional) - Step 1: Prepare the soap base
– Start by cutting the glycerin soap base into small cubes or chunks. Take the desired amount based on your mold size and how many diamonds you want to make.
– Place the soap cubes in a heat-resistant measuring cup or microwave-safe bowl for melting. - Step 2: Melt the soap base
– Using either a microwave or a double boiler method, melt the soap base. If using a microwave, heat for 30 seconds at a time, stirring in between, until completely melted and smooth.
– If using a double boiler, place the heat-resistant container with soap cubes in a pot filled with water. Heat the water on low to medium heat, stirring occasionally, until the soap melts. - Step 3: Add color and scent (optional)
– Once the soap base is melted, you can add soap colorant or mica powder to achieve the desired color. Mix well using a silicone stirring utensil.
– Add a few drops of essential oils or fragrance oils if you want scented soap diamonds. Stir again to distribute the fragrance evenly. - Step 4: Pour the soap into the diamond mold
– Before pouring the soap, make sure the mold is clean and dry.
– Slowly pour the melted soap into the diamond-shaped cavities of the mold, filling them to the top. - Step 5: Remove air bubbles
– To remove any air bubbles trapped in the soap, lightly spray the surface with rubbing alcohol. This helps in achieving a smooth finish. - Step 6: Let the soap harden
– Allow the soap to cool and harden completely. This usually takes 30 minutes to 1 hour, depending on the soap base and room temperature. - Step 7: Unmold the soap diamonds
– Once the soap is fully hardened, gently push on the bottom of the mold to release the diamonds.
– If the soap doesn’t come out easily, place the mold in the fridge for a few minutes to help shrink the soap slightly, making it easier to pop out. - Step 8: Shape and decorate the soap diamonds
– Use a knife or soap cutter to trim any excess soap from the edges of the diamonds, if needed.
– If desired, you can further shape the diamonds by gently sanding their edges or corners on a soap-smoothing board or sandpaper.
– Decorate the diamonds with soap-safe glitter, mica powder, dried flowers, crystal gems, or soap embeds. You can press them onto the surface of the diamonds or embed them within the soap while it’s still soft. - Step 9: Allow the soap to fully cure
– After shaping and decorating, place the soap diamonds on a cooling rack or a clean flat surface to allow them to cure for at least 24-48 hours. During this time, excess moisture will evaporate from the soap, making it harder and longer-lasting.
Once the soap diamonds are fully cured, they are ready to be used or gifted! Remember to store them in a dry place away from moisture to maintain their quality.
Soap diamonds can be customized with different scents, colors, and additives through various methods. Here are some ways to personalize soap diamonds:
- 1. Fragrance: To add different scents, essential oils or fragrance oils can be incorporated into the soap. These oils come in various scents, allowing for a wide range of customization. Depending on personal preferences, scents can be chosen from floral, fruity, herbal, or even musky categories.
- 2. Coloring: Soap diamonds can be tinted or fully colored using skin-safe colorants. These colorants come in various forms such as liquid, powder, or mica and can be mixed to create a wide array of hues. Natural colorants like clays or botanical powders can also be used for a more organic touch.
- 3. Additives: Additives can be incorporated into soap diamonds to enhance their properties or aesthetics. Some common additives include:
– Exfoliants: Ground herbs, seeds, or gentle abrasives like oatmeal or coffee grounds can be added to create exfoliating soap diamonds.
– Moisturizers: Ingredients like shea butter, cocoa butter, or avocado oil can be added to enhance the moisturizing properties of the soap.
– Skin-nourishing ingredients: Honey, aloe vera, or yogurt can be included for their soothing and nourishing qualities.
– Botanicals: Dried flowers, herbs, or fruit peels can be added for decorative purposes or to provide a natural touch.
– Biodegradable glitter or shimmer powders: To add sparkle or shimmer, eco-friendly options like biodegradable glitters or mica powders can be used.
- 4. Layering or Embedding: Soap diamonds can be made more visually appealing by creating layers or embedding small shapes inside them. Different colored layers can be poured in succession, and once set, the soap can be cut into diamond shapes. Alternatively, small embeds like flower petals, seashells, or gem-shaped soap pieces can be placed inside the mold before pouring the soap mixture.
- 5. Molding and shaping: To truly customize soap diamonds, individual molds can be created with unique designs such as intricate patterns, initials, or symbols. Silicone molds are excellent options as they allow for detailed customization.
Remember, it is important to ensure that all additives used are safe for the skin and compatible with soap-making processes.
There are safety precautions that should be taken when making soap diamonds. Here are a few important safety measures to consider:
- 1. Working in a well-ventilated area: Soap making often involves using chemicals and fragrances, which can release fumes that may be harmful when inhaled. Ensure that you work in a well-ventilated space, preferably with open windows or a working ventilation system, to minimize exposure to these fumes.
- 2. Wearing protective gloves: It is recommended to wear gloves, such as latex or nitrile gloves, when handling soap-making ingredients to protect your skin from any potential irritation or chemical burns. Some ingredients used in soap making, like lye or fragrance oils, can be harsh on the skin.
- 3. Eye protection: As a precaution, consider wearing safety goggles or protective eyewear to shield your eyes from any accidental splashes or spills that may occur during the soap making process.
- 4. Proper clothing: Wear appropriate clothing, such as long sleeves and full-length pants, to minimize the chances of skin exposure to any potentially hazardous substances.
- 5. Keep away from children and pets: Soap making involves working with chemicals and hot substances. Ensure that children and pets are not present in the area while you’re making soap.
It is important to note that specific safety requirements may vary depending on the soap-making method, ingredients used, and local regulations. Therefore, it is advisable to thoroughly research the specific safety precautions and recommendations for the particular soap-making process you plan to follow.
FAQs for Making Soap Diamonds: A Christmas Craft
Soap Diamonds are decorative soap bars shaped like diamonds that can be used for washing hands, as well as for decoration purposes during the festive season. They are a unique and creative Christmas craft idea that can be customized with different colors, scents, and additives.
To make Soap Diamonds, you will need soap base, soap colorants, fragrance oils, diamond-shaped silicone molds, a double boiler or microwave, and any additional additives such as glitter or dried botanicals. Melt the soap base, add colorants and fragrance oils, pour the mixture into the diamond-shaped silicone molds, and let it cool until solid. Finally, remove the soap diamonds from the molds and they are ready to use!
Soap making supplies can be found at craft stores, online retailers, or specialized soap making shops. You can purchase soap base, soap colorants, fragrance oils, and silicone molds from these sources. Additionally, additives such as glitter or dried botanicals can be found in craft stores or online as well.
Making Soap Diamonds is relatively easy and can be a fun activity for both beginners and experienced crafters. The process involves melting the soap base, adding colors and scents, pouring into molds, and letting it cool. However, it requires attention to detail and patience, especially when working with fragrances and colors to achieve the desired results.
The time needed to make Soap Diamonds will depend on the size of the soap bars and the number of diamonds you wish to make. The creation process, including melting the soap base, adding colors and scents, pouring into molds, and cooling, can take anywhere from 1-2 hours. Keep in mind that the soap will need additional time to fully harden and solidify before removing from the molds.
Absolutely! One of the exciting aspects of making Soap Diamonds is the ability to customize them according to your preferences. You can choose from a wide range of soap colorants to create different shades or even mix colors to achieve unique hues. Similarly, fragrance oils or essential oils can be blended to create a delightful aroma for your soap diamonds.
Yes, you can add various additives to enhance the appearance and texture of your Soap Diamonds. Glitter, mica powder, or dried botanicals such as lavender, rose petals, or chamomile can be mixed into the melted soap base before pouring into the molds. However, ensure that the additives are skin-safe and won’t cause any irritation or allergies.
Soap Diamonds are made using skin-safe soap base, colorants, fragrances, and additives, making them safe to use for washing hands. However, it is essential to consider any allergies or sensitivities you or your guests may have to certain ingredients present in the soap. If you have concerns, perform a patch test before using the soap on larger areas of the skin.
Absolutely! Soap Diamonds can be an excellent handmade Christmas gift. They can be individually wrapped in decorative packaging or placed in a gift basket with other bath and body products. Personalizing the color, scent, and packaging can make them a thoughtful and unique present for friends, family, or coworkers during the holiday season.
The shelf life of Soap Diamonds largely depends on the ingredients used. Typically, handmade soaps can last around 6-12 months if stored properly in a cool, dry place away from direct sunlight. However, it’s important to keep in mind that fragrances and colors may fade over time. Properly packaging the soap diamonds in airtight containers or wrapping them can help to prolong their lifespan.
Remember, the most important aspect of making a Good Luck Angel for Christmas is to have fun and enjoy the process. Let your creativity shine, and may your angel bring an abundance of luck and happiness throughout the holiday season!