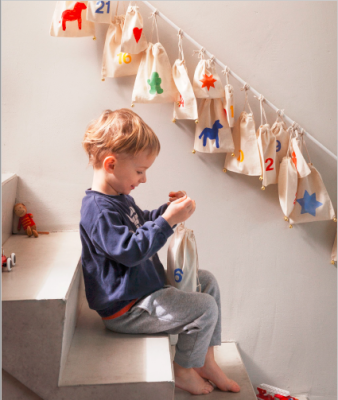
This lovely idea has a bag for every day of December up to Christmas Eve. It is destined to be a life-long companion; reused every year, or handed down to younger siblings
 Pin
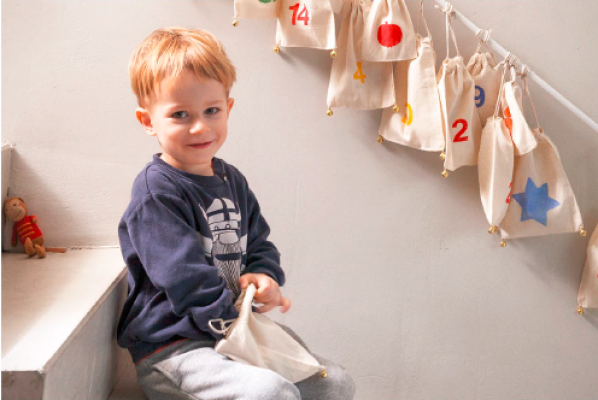
Pin Use a stamp to print little motifs on the individual Advent calendar pouches, which you can then hang up where you choose. This delightful calendar is easy to make and offers enough room for 24 little treats and presents. And, once Christmas is over, you can store it away in a pretty bag for next year.
 Pin
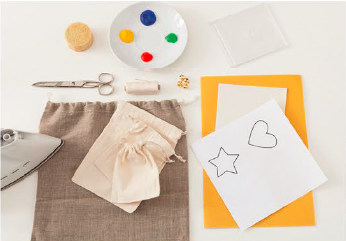
Pin You will need:
- Templates (See Below)
- Pen
- Scissors
- Self-adhesive foam
- Old CD cases
- Little sponges
- Fabric dye in red, blue, yellow, and green
- 1 large fabric bag, about 40 × 30cm (16 × 12in)
- Needle and thread
- Iron
- Newspaper
- 12 cotton bags, about 20 × 15cm (8 × 6in)
- 12 cotton bags, about 15 × 10cm (6 × 4in)
- 24 bells
How to make Advent calendar?
 Pin
Pin Step 1: First cut out the copied templates.
 Pin
Pin Step 2: Now transfer the shapes and numbers on to the foam and cut them all out.
 Pin
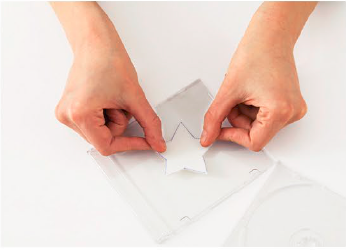
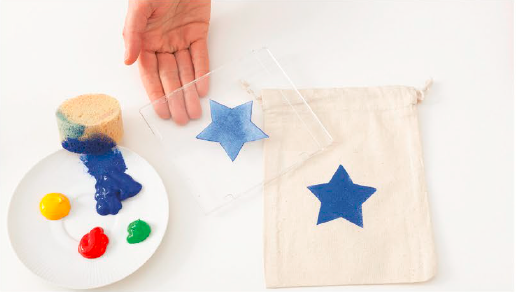
Pin Step 3: Stick the motif on the outside of a transparent CD case.(After stamping you can peel it off again and stick on another one, so you don’t need a new CD case for every motif.)
 Pin
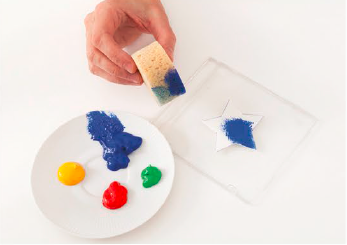
Pin Step 4: Use a little sponge to dab some fabric dye of your choice on to the foam until the entire surface is evenly covered
 Pin
Pin Step 5: Lay some newspaper inside the cotton bags to stop the dye coming through both layers, then stamp the foam shape on to the material. On the back of the bag stamp one of the numbers between 1 and 24.
 Pin
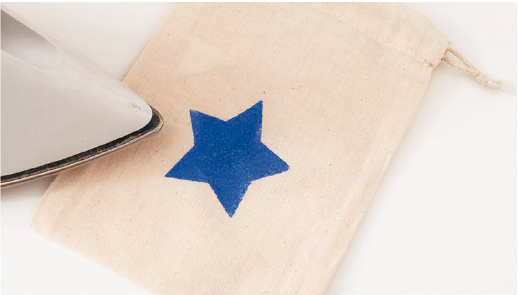
Pin Step 6: Allow the fabric dye to dry and then fix it according to the packet instructions, with the iron.
 Pin
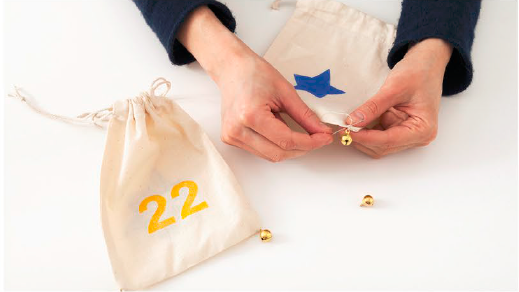
Pin Step 7: Finally, sew a bell on to each of the bottom corners of the large cotton bags.
 Pin
Pin Step 8: On the large fabric bag you can print the name of the future owner, plus various motifs. This bag can be used to store the Advent calendar between Christmases.
Stamp different motifs one after another with the same colour, so you don’t need to wash out the sponge every time.
 Pin
Pin  Pin
Pin The origins of the Advent calendar can be traced back to the 19th century. The first Advent calendars consisted of 24 little pictures with Christmas designs, which would be hung up individually on each day. Alternatively, people simply drew 24 chalk marks on the wall, one of which was wiped away each day, to show how many days were left until Christmas.
Templates :
 Pin
Pin 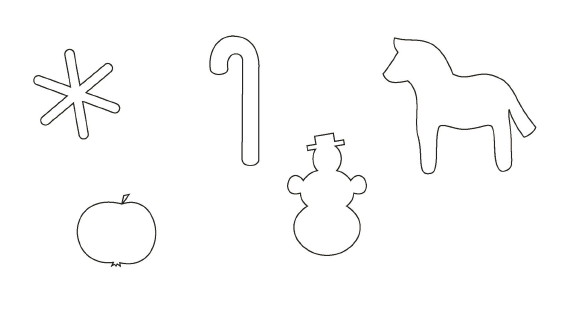 Pin
Pin 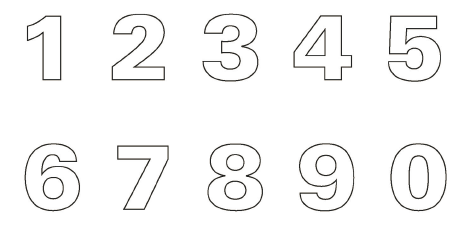 Pin
Pin  Pin
Pin Making an Advent calendar for Christmas is a fantastic way to add excitement and anticipation to the holiday season:
It not only helps children count down the days until Christmas but also serves as a fun and creative activity for the entire family. Whether you decide to purchase a ready-made Advent calendar or make your own, there are several steps involved in creating a personalized and meaningful calendar for this festive time of year.
- 1. Decide on the Design: The first step in making an Advent calendar is deciding the overall design and theme you want to go for. There are numerous options available, ranging from traditional to modern, simple to elaborate. You can choose to make a wall-hanging calendar, a tree-shaped calendar, or even a series of envelopes or small boxes to represent each day leading up to Christmas.
- 2. Gather Materials: Once you have a design in mind, it is time to gather the necessary materials. You will need construction paper or cardstock, scissors, glue or tape, markers or colored pencils, small treats or gifts, and any additional decorative elements like stickers, ribbon, or glitter. If you prefer a more eco-friendly option, you could also consider using recycled materials or creating a digital Advent calendar.
- 3. Plan the Activities or Treats: Along with the design, it is essential to plan the activities or treats you want to include in each day’s compartment. Traditionally, Advent calendars contained small chocolates or candies, but you can make it more personal by incorporating other items. For instance, you could write down a Christmas trivia question, include a family activity or craft idea, or even leave small notes with acts of kindness for each day. Be creative and make it special for your family’s preferences and interests.
- 4. Measure and Cut the Base: Begin by measuring the size of the calendar you would like to create. Take into account the number of days until Christmas and how many compartments you want to have. The base can be made from construction paper or a sturdy cardstock. Cut out the base in the desired shape and size, ensuring that it is large enough to accommodate the number of compartments you plan to have.
- 5. Create the Compartments: After cutting out the base, it’s time to create the compartments. If you have chosen a box or envelope style Advent calendar, cut out the appropriate shapes and fold them into individual compartments. If you opted for a more interactive design, like a hanging calendar, create small pockets or pouches from construction paper to hold each day’s surprise. Number each compartment with the corresponding day using markers or colored pencils.
- 6. Decorate the Calendar: Now comes the fun part – decorating the calendar! Use your artistic skills to add color, drawings, or patterns to the base of the calendar. Children can also get involved, adding their own personal touches to make it unique. Use stickers, cutouts, or any decorative elements you gathered to enhance the overall visual appeal.
- 7. Fill the Compartments: Once the calendar is decorated, it’s time to fill the compartments with treats, activities, or small gifts. Carefully place one surprise in each compartment, ensuring it fits properly. Make sure to remember where you put each item, as it may be necessary to adjust the positioning of the calendar to accommodate bulkier objects.
- 8. Hang or Display the Calendar: Finally, decide where and how to display your Advent calendar. Hang it on a wall, place it on a tabletop, or attach it to a door or window. Choose a location that is easily accessible for everyone to open the daily compartments and enjoy the surprises within.
- 9. Begin the Countdown: As December 1st approaches, the countdown begins! Encourage the family to gather each day to open that day’s compartment, relishing in the treats or activities within. This daily ritual helps build anticipation and excitement for Christmas Day.
Making an Advent calendar for Christmas is a delightful holiday tradition that brings families closer together. It allows children and adults alike to embrace the spirit of giving, appreciating each day leading up to Christmas. The process of creating the calendar offers a chance to get creative and personalize the holiday experience for your family, making it a cherished and memorable tradition for years to come.
To create an Advent calendar for Christmas, you will typically need the following materials and supplies:
- 1. Cardboard or thick paper: To create the base and individual compartments of the calendar.
- 2. Wrapping paper or decorative paper: To cover the cardboard and create a festive look.
- 3. Scissors: To cut out the required shapes and sizes of the calendar.
- 4. Glue or tape: To secure the wrapping paper to the cardboard and to assemble the compartments.
- 5. Ribbon or string: To hang or attach the calendar.
- 6. Markers, stickers, or other decorative elements: To personalize and embellish the calendar.
- 7. Numbered labels or small envelopes: To mark each day from 1 to 24.
- 8. Small treats or trinkets: To place inside each compartment as surprises for every day leading up to Christmas.
Optional materials may include:
- 9. Miniature clothespins or clips: To attach the numbered labels or envelopes to the calendar.
- 10. Craft supplies: Such as glitter, sequins, or buttons, to further decorate the calendar.
- 11. Small toys, candies, or messages: Instead of treats, you can include other surprises.
- 12. Clear adhesive pockets or small gift bags: To create more organized compartments or to conceal larger treats.
Remember, the materials can vary depending on the design and complexity of the Advent calendar you want to create.
Another step-by-step guide on how to make an Advent calendar:
- Materials needed:
1. Cardboard or foam board
2. Wrapping paper or decorative scrapbook paper
3. Small envelopes or mini gift bags
4. Scissors
5. Glue or double-sided tape
6. Number stickers or markers
7. Ribbon or string
8. Small treats, toys, or notes for each day of Advent - Step 1: Decide on the design and size of your Advent calendar. It could be a traditional calendar with doors or pockets, or a more creative design like hanging ornaments or small bags.
- Step 2: Cut the cardboard or foam board into the desired shape and size for your calendar base. It could be a rectangle, square, or any shape you like.
- Step 3: Wrap the cardboard or foam board with the wrapping paper or decorative scrapbook paper. Use glue or double-sided tape to secure it neatly.
- Step 4: Determine how many days you want your Advent calendar to have. Traditionally, Advent lasts for 24 days, but you can modify it to fit your preference. Divide the board into equal sections to accommodate the number of days. For example, if you want 24 days, divide it into 6 rows of 4 rectangles each.
- Step 5: Attach the mini envelopes or gift bags to the cardboard. You can glue them directly or use double-sided tape to secure them. Arrange them in the desired pattern.
- Step 6: Add unique touches to each envelope or gift bag. You can personalize each day by adding small treats like candies or chocolates, tiny toys or trinkets, or even handwritten notes with a special activity or quote for that day.
- Step 7: Number each envelope or gift bag from 1 to the total number of days. You can either use number stickers or handwrite the numbers using markers.
- Step 8: Create a way to hang your Advent calendar. Attach a ribbon or string to the top of the calendar, making sure it is secure enough to hold the weight.
- Step 9: Hang your Advent calendar on the wall or door, and enjoy the countdown to Christmas Day!
Tips for adding personal touches:
- 1. Customize the wrapping paper: Use patterned or themed wrapping paper that reflects the recipient’s interests or your chosen theme, such as winter or holiday motifs.
- 2. Handmade envelopes or bags: Instead of store-bought envelopes or bags, create your own using colored paper, scrapbook paper, or even fabric. This adds a handmade touch and allows for more creativity.
- 3. Activity-based calendar: In addition to treats or toys, you can add activities for each day. These could include Christmas movie nights, cookie baking sessions, or holiday crafts.
- 4. Include meaningful messages: Write personalized notes for each day, such as compliments, words of encouragement, or reasons why you appreciate the recipient.
- 5. Unique countdown ideas: Instead of consecutive counting, you could create a non-linear calendar with different activities or surprises for each day.
By following these steps and adding personal touches, you’ll have a creative Advent calendar filled with joy and anticipation for the holiday season!
Involving your children in the process of making an Advent calendar can be a fun and engaging activity that allows them to express their creativity and contribute to the holiday preparations. Here are some ideas on how to involve your children in making an Advent calendar:
- 1. Planning and brainstorming: Sit down with your children and discuss ideas for what they would like in the Advent calendar. Ask them about their favorite holiday activities, treats, or symbols, and incorporate those into the planning. Encourage them to draw or write down their ideas.
- 2. Materials and decorations: Take your children to a craft store or gather materials at home. Let them choose colorful papers, markers, stickers, ribbons, or any other decorations they like. Get different sizes of envelopes, small boxes, or other containers to hold the surprises for each day.
- 3. Design and assembly: Lay out all the materials and let your children design the calendar. They can cut out numbers from colored paper or use pre-purchased number stickers to create a sequence for each day. Allow them to decorate the envelopes or containers using their preferred materials.
- 4. Surprise selection: Involve your children in deciding what goes into each envelope or container. Ask them about their favorite treats, small toys, or activities they would like to have each day. This helps them feel excited and invested in the calendar and encourages creativity.
- 5. Filling and closing: Have your children put the chosen surprises into each envelope or container. They can also decorate the outside using stickers or drawings. Depending on the design, help them close the envelopes or containers securely, ensuring they can be opened easily each day.
- 6. Calendar display: Find a prominent place to hang or display the Advent calendar. Allow your children to decide where it should go, such as on a wall, door, or a special Christmas tree dedicated to the calendar. Make it easily accessible so they can open each day’s surprise.
- 7. Daily activity: Encourage your children to take turns opening the daily surprise. Let them feel the anticipation and joy of discovering what’s inside. This can be a special moment shared together as a family.
Remember, involving your children in the Advent calendar-making process will not only create cherished memories but also promote their creative and decision-making skills.
Some creative ideas and design for making an Advent calendar that can be personalized and reflect the holiday spirit:
- 1. “Santa’s Workshop” Advent Calendar: Create a miniature workshop scene using recycled cardboard boxes. Paint and decorate each box to resemble Santa’s workshop, complete with tiny gingerbread men, candy canes, and presents. Number each box and hide a small treat or note inside.
- 2. “Winter Wonderland” Advent Calendar: Cut out different-sized snowflakes from white cardstock or paper and attach them to a large poster board or canvas. Write numbers on each snowflake and hang small envelopes or bags from the middle of each snowflake. Fill the envelopes with personalized notes, winter-themed puzzles, or small treats.
- 3. “Christmas Forest” Advent Calendar: Create a forest of small Christmas trees using cardboard or foam board. Decorate each tree with glitter, mini ornaments, and ribbons. Attach small boxes or envelopes to each tree with a number on them. Fill the boxes with personalized messages, small gift certificates, or little trinkets.
- 4. “Holiday Memories” Advent Calendar: Collect old photographs or print out recent ones that hold special memories for you and your family. Create a wall display by sticking the photos to a large board or hanging them with clothespins on a string. Label each photo with a number and place a small treat or note behind it.
- 5. “North Pole Express” Advent Calendar: Transform small cardboard boxes into train carriages and label each one with a number. Decorate each carriage with festive colors, draw windows, and wheels. Connect the carriages with string or ribbon and fill them with small surprises or mini-candies. Display the train on a mantel or shelf.
- 6. “Countdown to Christmas” Advent Calendar: Paint or print out a large Christmas tree on poster board or canvas. Attach small envelopes or pockets to the tree branches, one for each day leading up to Christmas. Fill the envelopes with holiday-themed activity ideas, such as baking cookies, watching a favorite holiday movie, or a family game night.
- 7. “Holiday Character” Advent Calendar: Choose a holiday character such as Santa Claus, Rudolph the Red-Nosed Reindeer, or Frosty the Snowman. Create a large cut-out or drawing of the character and divide it into numbered sections. Fill each section with a small gift, a clue to a holiday-themed scavenger hunt, or a holiday-themed joke.
Remember, the key is to use your imagination and tailor the Advent calendar to your preferences and holiday traditions. These ideas can be personalized even further by incorporating favorite colors, themes, or specific ornaments that hold sentimental value to you and your family.
Frequently Asked Questions: Advent calendar
An Advent calendar is a special calendar used to count down the days from December 1st until December 24th, leading up to Christmas Day. It is a popular tradition among Christians and serves as a fun way to build anticipation and excitement for the holiday season.
Making an Advent calendar can be a creative and enjoyable activity. Here are some steps to help you make your own:
- 1. Decide on the design: There are various designs and styles to choose from, such as a wall-hanging calendar, a box-shaped calendar, or individual pockets. Determine the size and shape that suits your preferences.
- 2. Choose the materials: You can use materials like paper, cardboard, or fabric to create your calendar. Consider using colored, patterned, or glittery materials to add a festive touch.
- 3. Determine the number of days: Advent calendars usually have 24 doors or pockets to represent each day leading up to Christmas. Ensure you have enough space for all the days you want to include.
- 4. Plan the treat or surprise: Think about what you want to put behind each door. It can be chocolates, small toys, notes, or anything that brings joy and excitement. Make sure the surprises fit into the calendar compartments.
- 5. Decorate the calendar: Get creative and decorate your Advent calendar with festive elements like ribbons, stickers, ornaments, or holiday-themed designs. This will make it even more visually appealing and fun.
- 6. Fill the calendar: Place the chosen treats or surprises behind each door or pocket. Ensure they are securely attached or hidden, so you can open them easily on the corresponding day.
- 7. Hang or display the calendar: Find a suitable place to hang or display your Advent calendar. It can be on a wall, a door, or placed on a shelf or table. Make sure it is easily accessible and visible.
Absolutely! If you prefer not to make your own Advent calendar, there are plenty of pre-made options available in the market. You can find commercially-produced Advent calendars in various designs and themes, ranging from traditional to modern. These calendars often come filled with chocolates or small gifts, saving you the time and effort of putting them together yourself.
Involving children in the process of making an Advent calendar can be a wonderful family activity. It allows them to contribute their creativity and get into the holiday spirit. You can assign them tasks such as decorating the calendar, adding the surprises, or even drawing or coloring the calendar’s design. This shared experience will not only create a sense of anticipation but also build fond memories for your children.
Certainly! Personalizing an Advent calendar is a great idea to make it even more special. You can tailor the surprises behind each door to the likes and interests of the recipient. For example, if they love reading, you can include quotes or small books. If they are into crafting, you can add tiny craft supplies or DIY projects. Alternatively, you can also choose a specific theme like a favorite movie, sport, or hobby and incorporate it into the calendar’s design and surprises. This personal touch will make the Advent calendar unique and meaningful.


