


 Pin
Pin Photo from thebetterindia
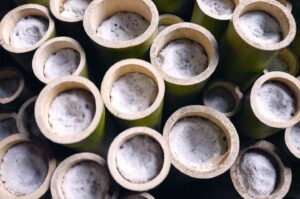
The idea of growing food at home feels comforting, especially when it fits into a busy routine. Mushrooms are among the easiest to grow without demanding complex tools or conditions. Their short growing cycle and rich taste make them a favorite for many home gardeners who want something productive yet low-maintenance.
Growing Oyster Mushrooms in Earthen Pots at Home offers not just a clean and eco-friendly method but a deeply rewarding experience. Unlike plastic bags or bulky wooden logs, earthen pots breathe naturally, keeping the growing environment moist and ventilated. That helps in faster growth and cleaner produce without risking contamination.
This method blends beautifully with urban balconies or compact backyards. It doesn’t require large investments or high-tech gear. Just the right setup, a bit of patience, and a humble earthen pot can lead to baskets full of tasty mushrooms within weeks.
Table of Contents
Why Earthen Pots Make the Best Mushroom Beds
 Pin
Pin Photo from thebetterindia
Earthen pots aren’t just traditional—they serve a powerful purpose in mushroom cultivation. Their porous nature allows air and moisture to pass through naturally. This means the mushrooms get the exact damp and airy conditions they love without artificial humidifiers or constant adjustments.
Unlike plastic containers that often trap too much water or create fungal rot, earthen pots breathe. They prevent the medium from overheating, keeping it cooler even during warmer days. This natural insulation helps the mushrooms develop evenly and resist disease or mold.
Another beauty of earthen pots lies in their sustainability. You can reuse them, compost the growing medium after harvest, and rinse the pot for another cycle. It’s a method that connects old-world wisdom with modern eco-consciousness—simple, efficient, and remarkably gentle on the environment. Mushrooms grown this way tend to be more aromatic and tastier too. Their earthy smell as they sprout brings a unique charm that other methods simply don’t offer.
Proven Benefits Backed by Research
Growing Oyster Mushrooms in Earthen Pots at Home isn’t just appealing—it’s backed by solid results. A study comparing re‑usable containers to plastic bags found that yield and efficiency matched or even surpassed the plastic method, while eliminating single‑use waste . Earthen pots share the same advantage: no plastic, reduced contamination risk, and a high-efficiency crop.
Earthen pots offer breathable conditions similar to re‑usable containers tested in labs. They allow moisture levels and temperature to regulate naturally, ensuring healthy mycelial growth and fewer failed attempts. In regions like Rajasthan, simple clay pot techniques have empowered gardeners to grow mushroom crops effectively during summer months—without sophisticated equipment .
Beyond yield, this method aligns with sustainability goals. Using pots that can be reused indefinitely and composting the spent substrate fits a zero‑waste lifestyle. Moreover, the soil amendment derived from mushroom cultivation enriches gardens long after harvest—bringing lasting benefits. This approach not only produces nutritious food but nurtures soil and supports eco‑friendly practices—a holistic win.
Step-by-Step Guide to Cultivate Oyster Mushrooms in Earthen (unglazed clay) pots at Home
1. Choose Your Clay Pot & Prepare the Substrate
- Start with an unglazed clay pot, about 6–8 inches across, with drainage holes—perfect for moisture regulation.
- Prepare substrate from chopped straw or straw mixed with hardwood sawdust. Soak in hot water (~65–85 °C) or use hydrated lime for 12–24 hours to pasteurize and kill competitors. Rinse and let it drain until it’s moist but not dripping—aim for ~60% moisture.
- 2. Inoculate with Spawn
Once substrate cools to room temperature, mix in oyster mushroom grain or sawdust spawn, using about 10–20% spawn by weight. Use clean hands or gloves to distribute evenly in a sanitized bowl. - Fill the clay pot loosely—around ¾ full—without compressing. Lightly mist to settle moisture. This encourages mycelium growth.
3. Incubate in a Dark, Humid Space
- Cover the top with breathable paper or cloth. Place in a cool, dark area (15–25 °C works well) for 10–14 days. During this period, keep humidity around 80–90% by misting once daily—don’t overwater.
- Look for white mycelium spreading—soil warms slightly, feels alive. If it smells earthy with a hint of anise, it’s a sign of healthy colonization.
4. Initiate Fruiting
- After full colonization (pot filled with white threads), create fruiting conditions:
Punch holes (2–3 cm wide) around the pot sides for mushrooms to emerge.
Expose to indirect bright light (kitchen or balcony). - Move to 18–22 °C and mist heavily around holes 3–5 times daily to maintain humidity .
Within 5–7 days, small pins (baby mushrooms) will appear.
5. Harvest & Encourage Flushes
- Harvest when caps begin to curl up slightly, by gently twisting or cutting at the base.
- After the first flush, continue misting and maintain moist conditions—expect 1–2 more flushes over the next 2–4 weeks.
6. Reuse & Compost
- Once production fades, empty pot and compost spent substrate. Rinse with water (no soap), sterilize briefly with hot water or vinegar, and reuse. Optionally add fresh spawn and substrate for a new cycle.
Health & Nutritional Advantages of Home-Grown Mushrooms
Cultivating oyster mushrooms at home brings an array of health benefits. These fungi are rich in fiber, protein, vitamins, minerals, antioxidants, and beta-glucans—all known for supporting immune and heart health. In fact, a study noted oyster mushrooms helped reduce cholesterol and improve blood sugar levels in human trials. Embracing these benefits at home ensures freshness and nutrient retention.
Home-grown mushrooms outperform many store-bought varieties in quality. When grown in breathable earthen pots, produce tends to be more aromatic and flavorful. The freshness ensures higher levels of volatile compounds and antioxidants—a key advantage over mass-produced mushrooms that lose potency during transit and storage.
Adding these home-grown mushrooms to your meals makes it easy to incorporate functional foods into your diet. Whether sautéing, blending in soups, or drying for powders and teas, the culinary options support wellness goals like immune strength, heart health, and blood sugar balance. Simply put, this method brings both flavor and nourishment directly to your plate, reinforcing the connection between home practice and well-being.
Eco-Friendly and Sustainable Gardening
Earthen pot mushroom cultivation aligns beautifully with eco-conscious living. The materials—clay pots and natural substrate—are biodegradable and reusable. After harvesting, spent substrate composts easily, enriching your garden soil without waste. This cycle reflects zero‑waste gardening principles, turning kitchen scraps into rich compost and fresh food.
This method also reduces plastic pollution. Unlike disposable plastic grow bags or kits, clay pots last for years, and even broken pieces can return to the earth. In Rajasthan, this clay-pot technique emerged as a sustainable, cost-effective alternative to plastic-based cultivation during hot summers.
Cultivating mushrooms at home supports biodiversity. Fungi naturally improve soil structure, increase microbial life, and even aid water retention. This small-scale practice contributes to a resilient garden system and demonstrates how urban growers can harness natural cycles to improve their immediate environment.
Troubleshooting & Tips for Success
While earthen pots are forgiving, a few precautions maximize success. Keep the substrate moist without waterlogging: mist the holes and sides daily. Ensure indirect light once fruiting starts. Too much exposure invites contamination, while too little delays mushrooming.
Watch for contamination early. If you spot green, black, or pink mold, remove that area immediately. That’s why pasteurization—through hot-water soak or lime treatment—is essential before inoculation. It reduces unwanted competitors and helps mycelium flourish.
For better yields, maintain mild temps (18–22 °C) and keep holes evenly spaced (~6–8 cm apart). Increasing spawn ratio can speed colonization and reduce risks. Experienced growers suggest using more spawn in small pots to overcome contamination and improve fruiting reliability.
FAQs
Once you inoculate and incubate in a cool, dark place, small pins typically appear in 10–14 days. Fruiting can begin around 2–3 weeks after starting incubation.
Oyster mushrooms thrive between 18–22 °C (64–72 °F) during fruiting. During incubation, slightly warmer, up to 25 °C, helps mycelial growth. Keeping temps too high or low can slow or prevent fruiting.
Aim for about 60% moisture—moist but not dripping. Mist daily to keep holes and pot damp. Too wet invites mold; too dry halts growth.
Green, black, or pink mold signals contamination. Remove affected area immediately. For future runs, pasteurize substrate using hot water and keep strict hygiene during inoculation.
Yes! Most pots yield 2–3 flushes. After the first harvest, keep conditions humid and mist regularly. When production stops, compost old substrate and reuse the pot for a fresh batch.